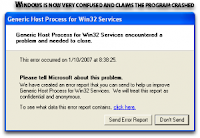
Pernahkah anda mengalami ketika sedang asyik surfing tiba-tiba muncul kotak dialog “Host Process for Win32 Services Error”, atau yang senada dengan itu? Jengkel?
Yah, ketika pesan seperti itu muncul, biasanya komputer lalu tidak bisa konek ke internet, dan walaupun kita coba untuk men-diskonek koneksi kita, tetap saja tidak bisa konek lagi, kecuali kalau sudah direstart.
Kejadiannya seperti ini:
1. Ketika sedang enak-enaknya surfing di internet, Anda lihat icon Internet tetap terkoneksi di system tray tapi Anda tidak bisa surf, browse atau melakukan apapun.
2. Anda mendapatkan suatu pesan error seperti “Generic Host Process for Win32 Services has encountered a problem and needs to close. We are sorry for the inconvenience.”
3. Pesan error report tentang kegagalan netapi32.dll dan svchost.exe.
4. Anda mencoba untuk diskonek internet Anda karena tidak aktivitas internet tetapi icon Internet tidak tampak.
5. Anda menerima sebuah pesan error seperti “Your PC has recovered from a serious problem”, dsb.
Lalu bagaimana mengatasi masalah tersebut?
Sebetulnya kalau kotak dialog tersebut dibiarkan tidak ditutup atau ditekan OK, biasanya koneksi kita akan terus berjalan. Jadi jangan kesusu menekan tombol OK di kotak dialog tersebut, tapi sembunyikan saja di tempat yang tidak kelihatan atau tidak menutupi layar, dan koneksipun akan tetap berlanjut. Namun itu biasanya hanya berlangsung beberapa saat saja, dan selang beberapa lama kemudian, layar akan ‘blink’ putih, dan tetap berjalan, tapi koneksi tidak tersambung.
Cara kedua sebetulnya sangat mudah sekali mendapatkan solusinya, yaitu dengan
mencarinya di mbah Google dengan mengetikkan kata kunci “Fix Generic Host”, dan Anda akan menemukan banyak sekali blog yang menulis tentang masalah ini. Diantaranya adalah seperti yang akan diurai berikut ini.
Menutup Port 445:
1. Start Registry Editor (Regedit.exe) dengan meng-klik Start menu, kemudian klik Run.
2. Pada kotak kecil yang terbuka, ketik: regedit kemudian klik OK. Registry Editor sekarang terbuka.
3. Carilah registry berikut:
HKEY_LOCAL_MACHINE\System\CurrentControlSet\Services\NetBT\Parameters
Di bagian kanan window carilah opsi yg bernama TransportBindName.
Dobel klik angka tersebut, kemudian delete default value, sehingga menjadi kosong (blank value).
Menutup Port 135:
1. 1. Kemudian Anda harus mencari kunci berikut : HKEY_LOCAL_MACHINE\Software\Microsoft\OLE
2. Anda akan melihat sebuah String Value yang bernama : EnableDCOM lalu Set-lah value ke: N (biasanya tertulis Y)
3. Tutuplah Registry Editor. Restart-lah komputer Anda.
Perhatian:
Sebelum melakukan perubahan pada registry tersebut, sebaiknya dibackup
terlebih dahulu, karena ada dampak dari perubahan registry tersebut,
seperti koneksi LAN tidak tersambung, dlsb.
Ada 4 solusi baru utk mengatasi Generic Host For Win32 Error di Windows, yang diambil dari Sizlopedia:
Solusi #1:
Klik ‘Run’ dan ketik ‘Regedit’
Klik bagian:
HKEY_LOCAL_MACHINE > SYSTEM > CurrentControlSet > Services > Browser > Parameters
Carilah dengan mengklik Find kata kunci : IsDomainMaster
dan set
Data: False
Restart PC kamu.
Solusi #2:
Klik ‘Run’ dan ketik ‘cmd’
Tulislah ‘netsh’ di konsol command lalu tekan enter
Kemduian ketik ‘winsock’ dan tekan enter lalu tulis reset
Restart PC Anda.
Solusi #3:
Download LspFix (http://cexx.org/lspfix.htm) dan ikuti langkah-langkah yang diberikan.
Solusi #4:
Download Microsoft Update Patch (http://support.microsoft.com/kb/894391) dan jalankan. “Thanx to Nirmal for this”.
Semoga salah satu dari solusi diatas akan menyelesaikan error yang ada.